teckers logo

How to Add a New Audio Track in DaVinci Resolve

audio

DaVinci Resolve is a great video editing software for both Windows and Mac. It’s very user-friendly and has many features that other video editing software does not. DaVinci Resolve is a leading video editing software currently used in some of Hollywood’s biggest movies.

We’ll show you how to easily add a specific type of audio track in DaVinci Resolve. As usual, we will use the latest version of DaVinci Resolve for our screenshots and descriptions.

Navigate to DaVinci Fairlight at the bottom of the software. Once you’re in Fairlight, right-click (Ctrl + Click on Mac) and select “Add new track” or “Add tracks”.

Adding a new audio track in DaVinci Resolve is easy! Follow the below steps, and you’ll have no trouble learning how to do it.

Expert advice when working with audio tracks in DaVinci Resolve

  • Organize your media: Before importing your media into DaVinci Resolve, it’s a good idea to have a well-organized folder structure. This will make it easier to locate and manage your files during the editing process.
  • Use submixes: When working with multiple audio tracks, consider using submixes. Submixes allow you to group related tracks together, making it easier to manage and apply effects or adjustments to multiple tracks simultaneously.
  • Optimize your audio levels: When adding a new audio track, be mindful of the overall mix. Adjust the volume levels of individual tracks to ensure a balanced and pleasant listening experience. Use the meters in the Fairlight tab to monitor the levels and avoid clipping or distortion.
  • Automate keyframes: To create smooth volume adjustments or fades, you can use automation keyframes. This allows you to set specific volume levels at different points in your timeline, with DaVinci Resolve automatically adjusting the volume between these points.
  • Utilize track presets: To save time when adding new tracks, you can create and use track presets. These preset store settings, like volume levels, EQ, and effects, allow you to apply a consistent sound to multiple tracks quickly.
  • Use the Track Inspector: The Track Inspector provides quick access to track-specific settings, such as volume, pan, and mute/solo options. This can be a valuable tool when working with multiple audio tracks.
  • Learn the keyboard shortcuts: Familiarize yourself with the keyboard shortcuts in DaVinci Resolve, especially those related to audio editing. This will greatly speed up your workflow and make the editing process more efficient.

By incorporating these expert tips into your workflow, you’ll be well on your way to creating polished and professional audio mixes in DaVinci Resolve. If you ever have any questions for us, do not hesitate to contact us for help. We’re always happy to give advice where we can. Happy editing!

Adding a new audio track in DaVinci Resolve

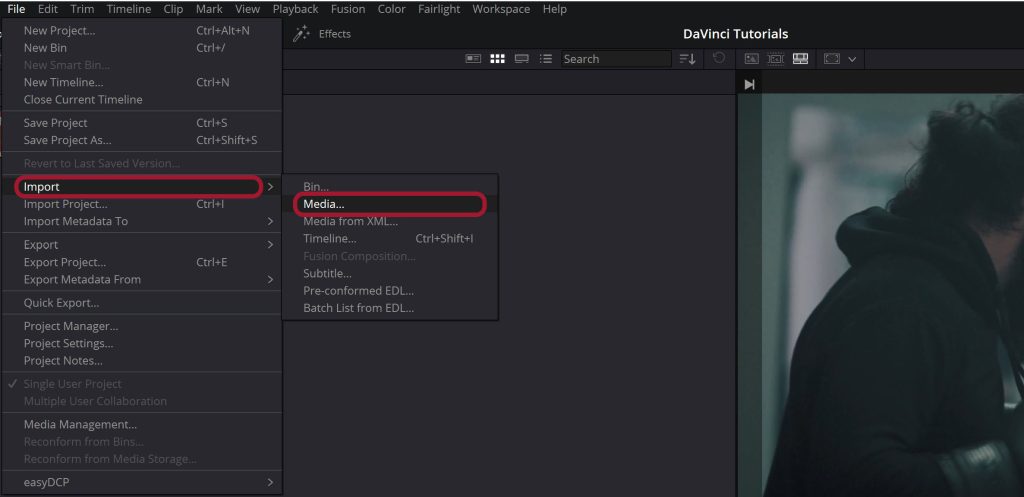
1. Open DaVinci Resolve and import your media

First, you’ll need to follow these steps:

  1. Launch DaVinci Resolve on your computer.
  2. Navigate to the “Media” tab. From that tab, you can access all of your project’s audio files, both existing and new ones you need to add.

Alternatively, you can go to File > Import > Media if you prefer to stay within the editing or Fairlight tabs.

Importing media in davinci resolve using the "file" > "import" > "media" method.

2. Go to DaVinci Fairlight to add your new track

You need to use DaVinci Fairlight to add your new audio track in DaVinci Resolve. Otherwise, you’re just adding another standard video track.

  1. Navigate to DaVinci Fairlight. The icon for Fairlight is located along the bottom of the DaVinci Resolve software. It should have a music icon.
Davinci resolve icons along the bottom of the software. Davinci fairlight icon is highlighted.
  1. Right-click the empty space underneath your current existing audio tracks. You should see an option saying “Add new track” or “Add tracks”.
Adding a new audio track in davinci resolve using the "add track" & "add tracks... " options.

Using these options, you should be able to add a specific type of audio track of your preference. DaVinci Fairlight supports many audio tracks, so one should suit your needs.

Learn how to show the waveform.

DaVinci Resolve supported audio formats and what they mean

Understanding these formats and their applications will help you make informed decisions when working with audio in your video projects.

Mono, or monophonic audio

Mono is a single audio channel that contains all the sound information. This format is suitable for simple projects, voiceovers, or situations where a single speaker or sound source is the focus.

In DaVinci Resolve, you can easily convert a stereo track to mono by right-clicking the audio clip and selecting “Mono” in the Clip Attributes window.

Stereo or stereophonic audio

This consists of two separate audio channels (left and right) that create a sense of depth and spatial positioning. This is the most common audio format for music, podcasts, and general video content.

In DaVinci Resolve, you can pan individual audio clips or tracks to the left or right channels to create a more immersive soundstage.

5.1 Surround

5.1 Surround sound is a multichannel audio format that uses six discrete audio channels – front left, front right, centre, surround left, surround right, and a dedicated low-frequency effects (LFE) channel. This format is widely used in film, television, and gaming to create a more immersive and cinematic audio experience.

On DaVinci Resolve’s Fairlight page, you can configure your project to use 5.1 surround sound, allowing you to position audio elements in a three-dimensional space.

7.1 Surround

7.1 surround sound is an extension of the 5.1 format, adding two more channels – rear left and rear right – to provide an even more immersive and spatially accurate audio experience. This format is commonly used in high-definition home theatre systems and premium cinemas.

In DaVinci Resolve, you can set up a 7.1 surround sound project on the Fairlight page and manipulate audio elements with precision across all eight channels.

Adaptive Audio Channels

Adaptive audio is an advanced format that dynamically adjusts the sound output based on the playback environment or system. This can include object-based audio formats like Dolby Atmos and DTS:X, which allow for individual sound elements to be positioned within a three-dimensional space with incredible accuracy.

While DaVinci Resolve does not natively support Dolby Atmos or DTS:X, it does offer support for multi-channel audio configurations, which can be used as a basis for creating adaptive audio mixes in specialized software.

When working with audio in DaVinci Resolve, understanding these different formats and their applications will help you create the best possible audio experience for your audience.

Whether you’re working on a simple podcast or a blockbuster film, choosing the right audio format is key to achieving a professional and immersive sound mix.

Video tutorial

Here’s a video tutorial we created that will run you through the above process in just 17 seconds.

Bonus step: Once you’ve added the new audio track to your project, you may need to adjust the settings for that track. Here are a few standard settings that you may need to adjust:

  • The volume level of the track
  • The EQ or filters on the track
  • The volume of each individual audio clip within the track

FAQ

How do I back up my project in DaVinci Resolve to prevent data loss?

To back up your project in DaVinci Resolve, regularly save and create backup copies of your project file. Store these backups in a separate location to prevent data loss.

How do I adjust the volume levels of individual audio tracks in DaVinci Resolve?

To adjust the volume levels of individual audio tracks, use the Track Inspector or automation keyframes on the Fairlight page. Monitor the levels using the meters to avoid clipping or distortion.

How can I create and use track presets to save time when adding new audio tracks?

To create and use track presets, save settings like volume levels, EQ, and effects as a preset. Apply the preset to new audio tracks for consistent sound and faster editing.

Conclusion

That’s all there is to it! Adding a new audio track in DaVinci Resolve is easy and can be done with just a few simple steps. Whether you need to add an existing audio file or a new one, following these steps will help you get the job done quickly and efficiently.

Always back up your project regularly so you can easily recover any lost or corrupted files. Good luck!

Picture of Robert Sutton

Robert Sutton

An unwavering enthusiasm for games, films, literature, and comics has always been a profound element of my life. I possess skills in SEO, mastery in using Adobe Software, proficiency in Microsoft Office, and a keen understanding of SQL Database operations.

Read more