


Proxies are lower-resolution versions of your video footage you can use for editing. They’re much easier on your computer, so you can edit faster and render your final project at full resolution without re-encoding your footage. So, how do you use proxy videos in Davinci Resolve?
Right-click your video clip and select “Generate Proxy Media”. Then, locate your proxy media (Usually Videos > Proxy Media) & import it into your timeline. You can edit Proxy video settings in “Master Settings” > “Optimized Media and Render Cache” > “Proxy Media Resolution“.
Keep reading for a step-by-step tutorial on how to add and use proxy videos in Davinci Resolve.
Video guide
Using proxy videos in DaVinci Resolve
1. Create a new project
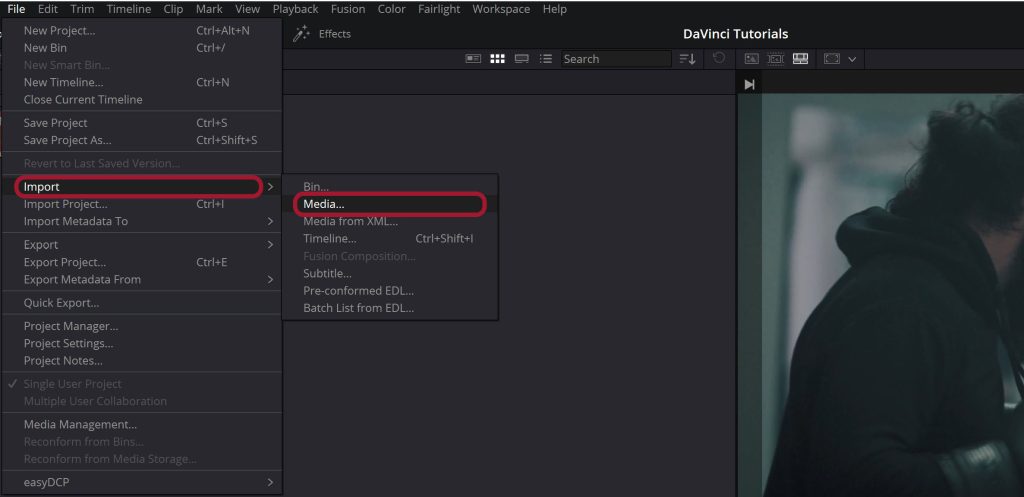
First, you’ll need to import your original video files into Davinci Resolve. Here are the steps to do that:
- Open Davinci Resolve and select “File“.
- Go to “Project Manager“.
- At the bottom of the window, click the box next to “Create New Project“.

2. Import your media into Davinci Resolve
Next, you’ll need to import your files into Davinci Resolve. Here are the steps to do that:
- Click the “Media” tab at the bottom of the screen.
- Click on “Import Files“.
- Click on the files you want and then click “Import Selected“.
3. Generate/Create your proxy media
Once you’ve imported your videos into Davinci Resolve, you’ll need to create your proxy media within the software.
- Right-click the clip you want to generate proxy media from.
- Select “Generate Proxy Media“.
- Wait for your proxy media to be created. It should appear in your media pool when finished.

4. Add your proxy video file to the timeline
You’ll need to add a copy of your proxy video file to the timeline. To do that, follow these steps:
- Click the “Media” tab at the bottom of the screen.

- Locate the proxy video file and drag it onto the timeline. Because you’re working with proxies, you’ll notice that the playback is much smoother than it would be if you were working with full-resolution footage.
5. Render out your final video project
Once you’ve made all of your edits and added all the effects you want when you’ve finished your project, it’s time to render your final video project. To do that, follow these steps:
- Go to the “Deliver” tab at the bottom of the screen.
- Click on the “Export” button and select your output settings.
- Click on the “Render” button to start the render process.
That being said, here are a few tips to help you work with proxies more effectively in Davinci Resolve:
- Consider using your proxy files’ exact resolution and frame rate as your full-resolution footage. Try to use the same codec as well.
- If possible, do as much work on your proxy files before you render them out and switch to full-resolution footage.
- Experiment with different proxy file formats to see which works best for your editing workflow.
Extra tip: You can generate proxy videos in Davinci Resolve by right-clicking the items in your media pool and selecting “Generate Proxy Media“. Here’s a video demo of the process:
Reducing the resolution of your proxy video
Once you start working with your proxy video, your editing experience should be much smoother than before (hopefully!).
If it isn’t, then you can go to your proxy video settings in “Preferences” > “Master Settings” > “Optimized Media and Render Cache” > “Proxy Media Resolution“.
You can reduce the resolution of your proxy media with this setting if your computer can’t quite handle the current resolution, anywhere from Original resolution down to one-sixteenth of your original resolution.
FAQ
Where does Davinci Resolve send my generated proxy files?
You can find out where Davinci Resolve sends the generated proxy files by going to “Preferences“ > “Master Settings“ > “Working Folders“. You can see here where your files are sent once generated.
How can I change where DaVinci Resolve sends my generated proxy files?
Navigate to “Preferences“ > “Master Settings“ > “Working Folders“. Then, change the “Proxy Generation Location” setting to your desired folder path location.
Summary
Using proxy videos in DaVinci Resolve is a fantastic feature and incredibly useful for those with slow computers. Being able to edit even down to 1/16 of the original resolution of a video enables almost anyone with a somewhat modern computer to edit videos (As long as they meet the minimum system requirements of the DaVinci Resolve software).


