In the realm of video editing, text plays a multitude of roles. From setting the stage with a compelling title sequence to providing crucial context via subtitles or end credits, the text is a cornerstone of storytelling. One of the most versatile tools at your disposal for manipulating text is Adobe Premiere Pro.
This guide will delve into how to add text in Premiere Pro, providing you with a comprehensive understanding of the process. Whether you’re a seasoned editor or a beginner, you’ll find this guide detailed yet easy to understand, helping you to enhance your video editing skills.
Let’s dive into the world of Premiere Pro and explore the art of text manipulation.
What is text used for in Adobe Premiere Pro?
- Title Sequences: Title sequences are the introduction to your video or film. They often include the name of the film, the director, the production company, and sometimes the main actors. They can be simple text on a black screen or complex animations that set the tone for the rest of the film. In Adobe Premiere Pro, you can use the text tool to create these sequences, choosing from a variety of fonts, colors, and animations to make your title sequence as unique as your project.
- Opening Credits: Opening credits are typically displayed at the beginning of a film or video and list the most important members of the production. They often include the names of the lead actors, directors, writers, and producers. In Adobe Premiere Pro, you can customize the look and feel of your opening credits using the text tool, adding animations or effects to make them more engaging.
- Closing Credits: Closing credits appear at the end of a film or video and provide a comprehensive list of all the people involved in the production. This includes everyone from the director and main actors to the camera operators and makeup artists. Adobe Premiere Pro allows you to create scrolling closing credits, where the text moves up the screen, similar to what you see in most movies.
- Time & Place Indicators: Text is often used in films and videos to indicate the time or location of a scene. For example, a text overlay might read “Paris, 1920” to indicate where and when the scene is taking place. Adobe Premiere Pro allows you to add these text overlays and customize their appearance to fit the aesthetic of your video.
- Dialogue Subtitles or Captions: Text is also used to display dialogue in the form of subtitles or captions. This is especially important for viewers who are hard of hearing or speak a different language. Adobe Premiere Pro has tools that allow you to add and customize subtitles, including adjusting their timing to match the dialogue.
- Lower Thirds: Lower thirds are a type of text graphic that appears in the lower third of the screen, hence the name. They are often used to introduce a person or provide additional information. For example, in a news broadcast, a lower third might appear when a new person is speaking to display their name and job title.
- Graphics and Data Visualization: Text in Adobe Premiere Pro can also be used to create graphics and data visualizations. For example, you might use text to create a bar graph or pie chart or to display statistics or other information in a visually engaging way.
In all these cases, Adobe Premiere Pro provides a range of tools and options to customize your text, including font, size, color, alignment, and animation. This allows you to create text that fits perfectly with your video’s style and purpose.
How to add text in Premiere Pro
Adding text in Premiere Pro is a straightforward process. You can customize everything from color, size, font, and animation right inside the program. Here’s how to do it:
Method 1: The Essential Graphics Panel
1. Navigate to the graphics panel
Find your way to the graphics panel by clicking on Window along the top of the Premiere Pro software. Once this is done, scroll down to Workspaces and select it. The Graphics panel will appear just above the preview window at the top of your project. Select it.

2. Selecting your chosen template
If you followed the steps correctly so far, you’d see the Essentials Graphics panel on the right-hand side of the Premiere Pro software. Click on Browse. This will show you graphics templates that you can use by dragging them into your sequence.

3. Editing your text
Once you’ve dragged your chosen template into your sequence, the only remaining task is to double-click on the text in your preview window. A red box will appear around your text; you can now start editing the text however you like.
If you’d like to add effects to your text and edit it differently, you can apply different effects to the template by going to Effect Controls and dragging the effects over your text clip in the sequence.

Method 2: Simple Text
You can add text to a video clip from either the Essential Graphics panel. You can also use the keyboard shortcut Ctrl+T (or Cmd+T for Mac users) to open a new text box.
If you want to customize the text, being in the Essential Graphics panel will be the easiest.

Method 3: Add text with the Type Tool (T)
To add text using the Type Tool, navigate to the toolbar. If you don’t see it, go to Windows > Tools. Click and hold down the Type Tool for a moment, and the Type Tool and Vertical Type Tool options will show.
Once you’ve selected the Type Tool, you can click anywhere in your program panel and start typing. You can also create a larger text box by clicking in your viewer and dragging it with the Type Tool.

Styling the text
Customizing the Text Shape, Size, and Color
To customize your text for things like shape, size, and color, you need to be in the Essential Graphics panel. From here, you can modify the text as you see fit within your project.
If you can see the essential graphics panel, you can enable it by going to Windows > Essential graphics.

Consider adding a custom font
Adobe Premiere Pro has a set amount of font styles already loaded in the program, but you might want to use another font in your project. If so, you can add additional fonts by going to the “Add Adobe Fonts” option at the top right-hand corner of the drop-down font menu.
This will open a new tab in your browser and bring up Adobe Fonts, the main fonts database. Once you’re in Adobe Fonts, simply pick the desired font and activate it. The activated fonts will show up in the font options inside Adobe Premiere.

Adding text behind objects
You can learn how to add text behind objects in this Premiere Pro video tutorial.
Handwriting write-on effect
Creating cinematic title reveals
How to add titles in Premiere Pro
Titles are like text elements in that they convey words, but they tend to have a little more flair to them, whether that be animation, 3D effect, or unique coloring.
If you want to add a title, go to the Essential Graphics panel or the main menu and choose Windows > Workspaces > Graphics. Once you’re there, you can browse the pre-made title templates, both still and animated.
To add a rolling or crawling title, go to Effect Controls once you have created your text and position it on the timeline panel. Place it in the center of the screen below the frame.
Under Transform, you’ll need to add a marker or keyframe by selecting the stopwatch icon by Position. Then, move the playhead to where you want the credits to stop rolling. Once this is selected, move the credits to the last position.
How to add text in Premiere Pro: a more detailed guide
Here’s a more detailed step-by-step process:
- Create a Text Area: Rather than just selecting the text tool and starting to type, you need to create an ‘area text’. You can do this by selecting the Area Type Tool and then dragging out an area from the top left of the inner box (called the title safe area) to the bottom right of the same inner box. Simply click inside this area to add text.
- Add Your Text: Once the text cursor is flashing, you can start creating your titles. Font, size, etc are all up to you. Type out some names until they go off the screen. Once text has gone off the screen, you’ll see a little ‘+‘ sign, which is simply telling you that there is more text than shown.
- Create the Rolling Title: Make sure you have the text tool selected. Hold the Control Key (on PC) or Command Key (on Mac), and drag the handle at the middle of the bottom of the screen until you can see the next text. Continue this process until all your text is added.
- Set the Roll/Crawl Options: Decide how long after the title appears do you want the title to wait before it starts rolling up the screen. You can also set how slowly you want the text to start moving. For example, if you want the text to start on the screen and then start to roll up, choose a Preroll amount in frames, not seconds.
Remember, practice makes perfect. The more you use Adobe Premiere Pro, the more you’ll get familiar with all its functionalities, including adding text. Happy editing!
Video guide
Great uses of on-screen text in Movies & TV
“Sherlock” (BBC TV Series)
This series uses on-screen text to show Sherlock’s thought process, displaying his deductions about people and situations directly on the screen. It’s a unique way of visualizing the character’s quick thinking and attention to detail.

“House of Cards” (Netflix Series)
In this political drama, text messages between characters are displayed on the screen. This method allows the audience to follow the conversation without cutting away to a shot of a phone screen.

“Stranger Things” (Netflix Series)
The opening title sequence of this series is a great example of text setting the mood. The retro, neon, 3D-styled text perfectly encapsulates the 80s nostalgia that the show is known for.

“Star Wars” (Film Series)
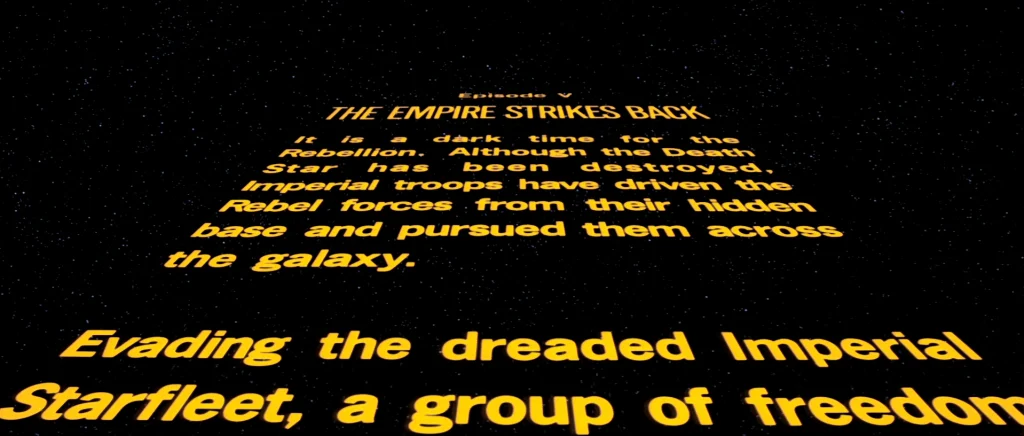
The opening crawl text at the beginning of each Star Wars movie is iconic. The scrolling text against a starry background provides a brief backstory and sets the stage for the action to come.

“Scott Pilgrim vs. The World” (Film)
This film uses creative on-screen text throughout to mimic the style of the graphic novels it’s based on. Text is used to introduce characters, show sound effects, and even illustrate the protagonist’s emotions.

Summary
Adding text in Adobe Premiere Pro is a critical skill for any video editor. Whether it’s for title sequences, credits, time and place indicators, or subtitles, the ability to incorporate and manipulate text can significantly enhance your video’s impact and professionalism.
Remember, the key to effective text usage in Premiere Pro is not just about the technical process of adding the text, but also about the creative decisions you make. The font, color, size, and animation you choose can all contribute to the mood and message of your video.
This guide has provided you with a comprehensive understanding of how to add text in Premiere Pro. However, like any tool, the best way to truly master it is through practice. So, don’t hesitate to experiment with different text styles and effects in your next project.
With the power of Adobe Premiere Pro at your fingertips, you’re well on your way to creating compelling and professional videos. Happy editing!


