If you use Resolve, which is easily the best video editing software you can get, and you plan on doing video editing or motion graphics work, knowing how to mask in DaVinci Resolve is mandatory. As a video editor or a motion graphics artist, the most common jobs will be masking footage, ranging from vignettes to rotoscoping.
In this article, I will get you up to date on the basics of masking in DaVinci Resolve. Masking becomes available inside the Color and Fusion tab. In this article, I will show you how to use both tabs to mask.
Get some free DaVinci Resolve effects.
What is Masking?
Masking is a tool in post-production that allows you to outline an area in a video you want to hide, reveal, modify, or apply effects to it. Therefore, combining more video clips inside one video is possible. Create masks using the masking tool to make all of this possible.
In DaVinci Resolve, you have many masks to choose from. The most common masks are available in the toolbars of every tab.
Masking inside the Color Tab in DaVinci Resolve
Before we start, in the Color tab, add an alpha output in the Nodes window. Otherwise, your mask will not work at all. Right-click anywhere in the nodes window and select “Add Alpha Output.” To complete the task, link the node to the newly created output.
Now that you have added an alpha output select the Window menu to bring up the window masks. Five types of masks are available for you to use: a Linear mask, a Circle mask, a Polygon mask, a Curve mask, and a Gradient mask.
Curve Mask
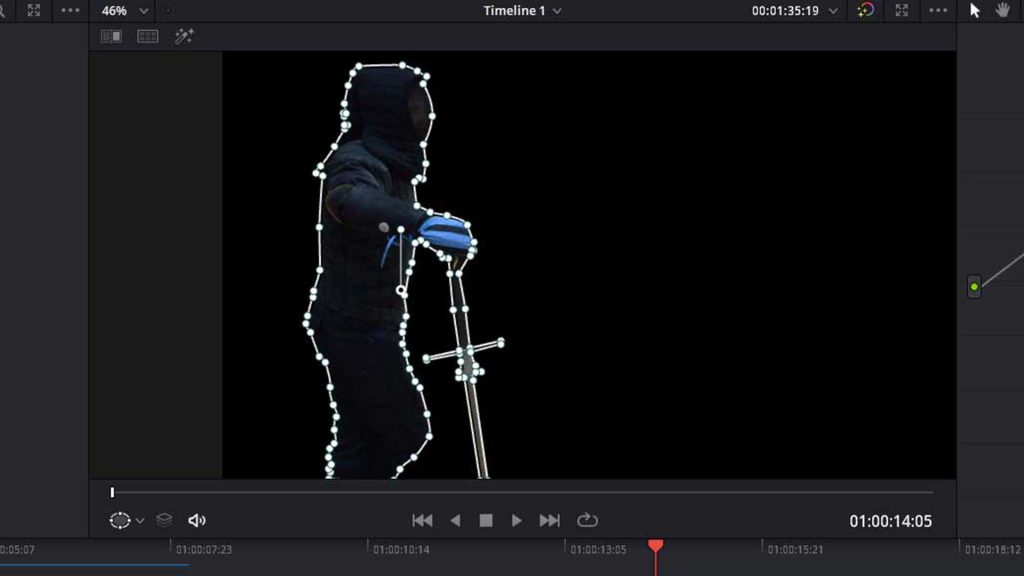
The one you will be most interested in is the Curve mask. With it, you can outline different objects and separate them from the background, just as I did in my example. Closely outline the object, and when you finish, close the mask by clicking on the first dot.

Mask Properties
From here on, you can adjust your mask properties — you can soften the edges, shrink or expand it, or play with the transform option if that is what you need. All these options are available right next to the mask window on the right side.

As you can see, I increased the softness and the inside value so I could get rid of the imperfections from my original roto.
By pressing on the highlighted symbol, you can set the mask to add or subtract. Depending on what type of mask you need, this is how you do it.
The mask’s lines and dots can be distracting. If you want to see how precise your roto is, you can choose to hide them from the mini-menu situated at the bottom left corner of the timeline’s preview window.

Select Off, and all the lines and dots will be hidden. To bring them back, you have to select Power Window.
Animating a Mask in the Color Tab
Inside the Color tab, you can also animate your masks with ease. Just like you would do a basic animation, press on the diamond-shaped symbol from the keyframes window located at the bottom right corner, move forward one or more frames, and adjust the mask how you need it to be.

Cool! Now you know how to mask in DaVinci Resolve using the Color tab. The Fusion also has this feature so let’s see how to do it!
Masking inside the Fusion Tab in DaVinci Resolve
In the Fusion tab, the mask toolbar has the following types of masks: Rectangle, Ellipse, Polygon, and B-Spline. All the other masks are available from Effects Library > Tools > Masks.
Also, be sure to check out the DaVinci keyboard shortcuts to speed up your editing.
Rectangle and Elipse
Modify the mask settings in the Inspector window to adjust it the way you want. The Filter drop-down gives you five types of blur to choose from when applying and adjusting the Soft Edge and Border Width. You can also adjust the basic transform properties such as Center, Width, Height, and Angle in the Inspector window.
Polygon and B-Spline
Apply a Polygon or B-Spline mask to MediaIn1, don’t worry if the video will disappear. After you complete drawing the mask, the video inside the mask will appear again.
Select Polygon1 or B-Spline1, and press the “1” key to load its alpha into the left viewer. Select one of the masking tools and draw a shape. When closing the mask, a circle will appear when the mask is closed, and you now will have the alpha output on the left preview screen.
Once you close the mask, Fusion will give you the Insert and Modify tool. Click on the mask with this tool to modify an existing point or add a new one. To only modify a mask, switch to the Modify Only tool.
Animating Masks in the Fusion Tab
To animate a mask in the Fusion tab, just like in the Color tab, make use of the diamond-shaped symbol to add keyframes and change the basic transform properties, the mask shape, or edge softness.
If you want to do a rotoscoping, simply go forward in time, adjust the mask to the outline of the subject, and the mask will automatically animate.
Awesome! Now you can become a pro. How to mask in DaVinci Resolve should not be a problem anymore, right? Use either the Fusion or Color tab and make your mask, just like I showed you.


