Do you need to save part of your video clip as an image? You could use this image on your website or share it with friends and family, essentially making a photo out of your video. You can easily do this with the powerful video editing software DaVinci Resolve.
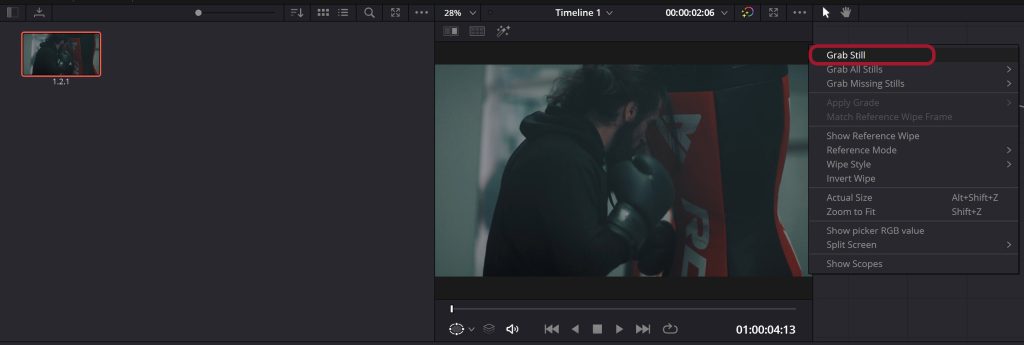
To export a frame image from DaVinci Resolve, go to the Color tab and scroll to the position you want to save. Next, right-click on the scene and select “grab still” to save an image file. Finally, right-click the image, select “Export” to choose an image format like PNG, and then save the file.
Export a frame image from a video in DaVinci Resolve
1. Open DaVinci and import the video
To start, open DaVinci Resolve and import your video file into the media library. Here are the specific steps:
- Double-click the DaVinci Resolve icon on your desktop, taskbar, or start menu to open the software.
- In the media library, select “File” > “Import” and choose the video file from which you want to export a frame image.
- The video will be added to the media library and appear in the viewer window on the right side of the software. Next, drag it down into your timeline, where you can edit and manipulate the video before exporting it as an image. (You can do this in the edit tab at the bottom of the software).

2. Go to the Color tab
Now that your video is in the timeline, you can export any frame from it as an image.
- In the viewer window, go to the Color tab at the bottom of the screen. Here, you should see a viewer frame indicator.
- Scroll through the indicator until you find the exact frame you want to export as an image. Ensure everything looks perfect.

3. Right-click & Grab Still
Once you’ve found the right frame, follow these steps:
- Right-click the frame.
- Select “Grab Still” from the dropdown menu. That will take a screenshot of that exact frame. An image will still appear on your video’s left side if you use the default DaVinci Resolve layout.

4. Export your frame as an image
Finally, it’s time to save your image. Here are the steps:
- Right-click on your snapshot where it appears on the left side of your video.
- Select “Export” from the dropdown menu. You can choose the image format you want to export your frame – like PNG or JPEG.
You can also highlight many stills at the same to export all of them.

Optional step: Exporting with display LUT
You can also choose “Export with Display LUT” below the Export option. This is only for people using LUTs within their projects (We highly recommend this if you want to elevate your project). You can find LUTs for your videos at BounceColor.
Not sure what a LUT is? You can read up on what LUTS are on Bounce Color & why you should use them. The experts over at BounceColor provide both simplified & detailed explanations for beginners & professionals alike.
Video tutorial
Here’s a quick video walkthrough of the steps we’ve described above:
Summary
Taking a screenshot of your video clip has never been easier with DaVinci Resolve. Just follow these steps, and within minutes, you’ll have a snapshot of any part of your video ready to share with family and friends or post online for everyone else.
Remember, always preview your image before saving it and exporting it. That will ensure you get the perfect shot with no errors or glitches.


